You have a Google Sheet full of deadlines, meetings, or project milestones — and you want them on your calendar without copy-pasting each one by hand. Google Apps Script makes this a one-function job. The built-in CalendarApp service can read any row from your sheet and create a fully formed Google Calendar event in seconds. No Zapier, no Make, no third-party tools. By the end of this guide you will have a working script that creates a calendar event from a sheet row, a time-based trigger to run it automatically, and a clear mental model of how CalendarApp works so you can extend it yourself.
What You Need Before Starting
You need a Google account with access to Google Sheets and Google Calendar — nothing else. The script runs entirely inside Google's infrastructure. Open a new or existing Google Sheet, then go to Extensions → Apps Script to open the script editor. That editor is where every snippet in this guide goes.
Step 1 — Set Up Your Sheet Structure
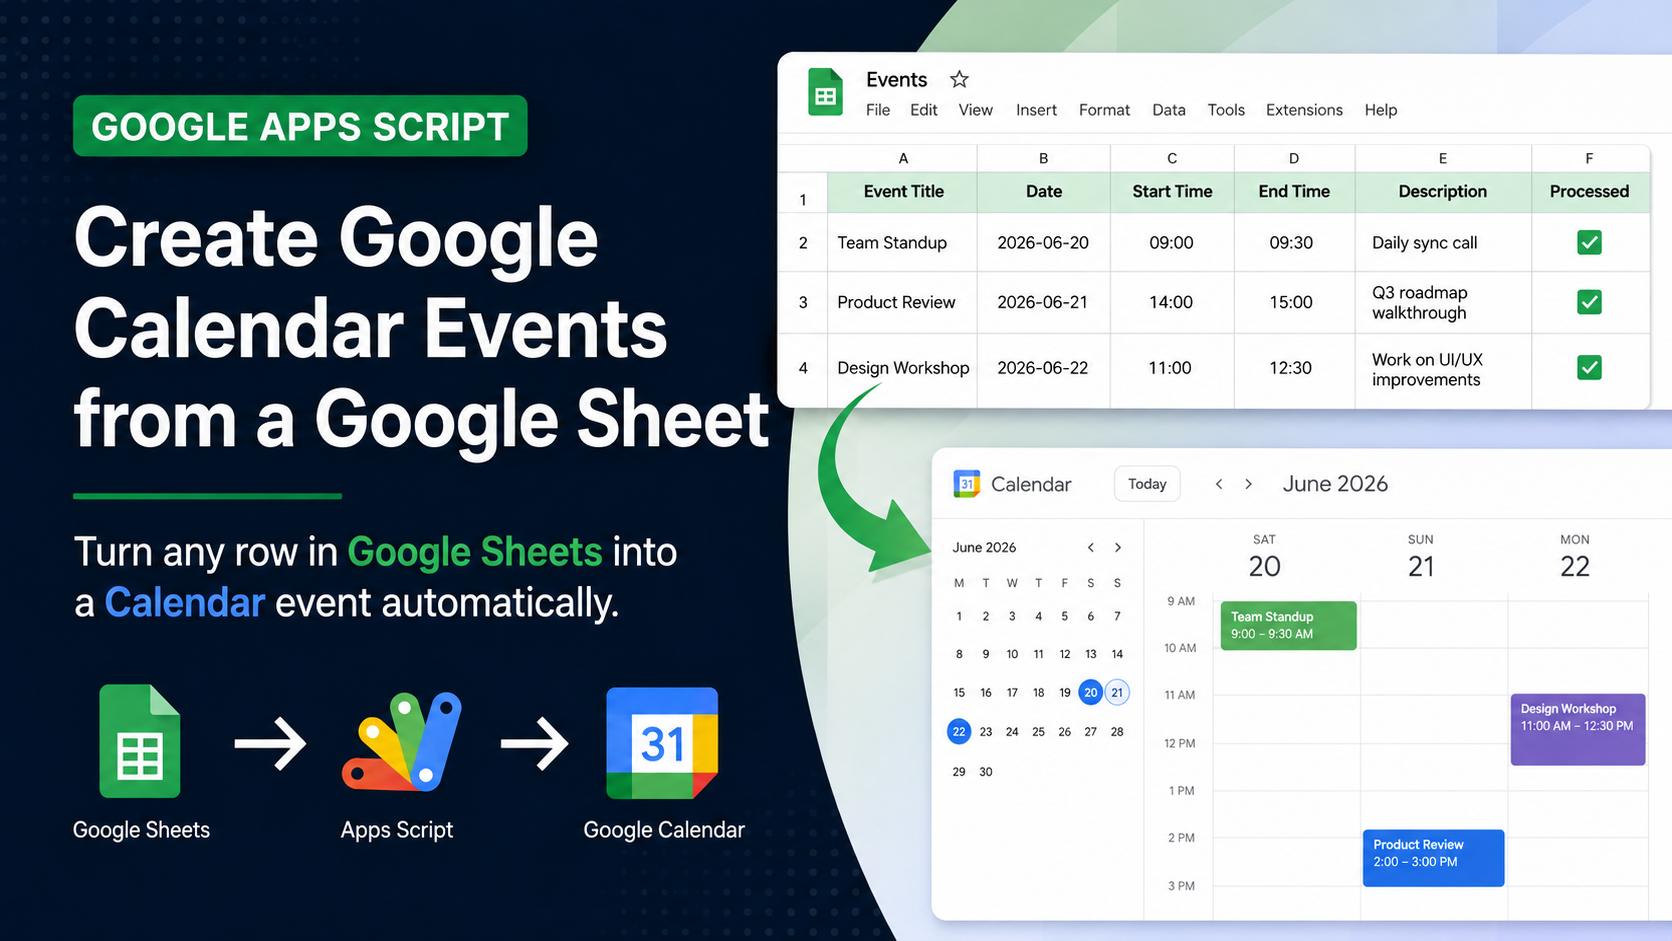
Your sheet needs at least four columns so the script knows what event to create and when. Use this layout in Row 1 as headers:
| A: Event Title | B: Date       | C: Start Time | D: End Time  | E: Description        |
|----------------|---------------|---------------|--------------|------------------------|
| Team Standup   | 2026-06-20    | 09:00         | 09:30        | Daily sync call        |
| Product Review | 2026-06-21    | 14:00         | 15:00        | Q3 roadmap walkthrough |
Dates in column B should follow the YYYY-MM-DD format and times in columns C and D should use 24-hour HH:MM notation. This keeps parsing predictable. If your existing sheet uses a different format, you can adjust the parsing logic in Step 2.
Step 2 — Write the Core Function
Paste this script into the Apps Script editor and save it with Ctrl+S (or Cmd+S on Mac):
function createCalendarEventsFromSheet() {
  const sheet = SpreadsheetApp.getActiveSpreadsheet().getSheetByName('Sheet1');
  const calendar = CalendarApp.getDefaultCalendar();

  // Get all data rows, skipping the header (row 1)
  const data = sheet.getRange(2, 1, sheet.getLastRow() - 1, 5).getValues();

  data.forEach(function(row) {
    const title       = row[0]; // Column A
    const dateStr     = row[1]; // Column B  e.g. '2026-06-20'
    const startTime   = row[2]; // Column C  e.g. '09:00'
    const endTime     = row[3]; // Column D  e.g. '09:30'
    const description = row[4]; // Column E

    // Skip empty rows
    if (!title || !dateStr) return;

    // Build full Date objects for start and end
    const startDate = new Date(dateStr + 'T' + startTime + ':00');
    const endDate   = new Date(dateStr + 'T' + endTime   + ':00');

    calendar.createEvent(title, startDate, endDate, {
      description: description
    });

    Logger.log('Created: ' + title + ' on ' + dateStr);
  });
}
Click Run in the toolbar. The first time you run it, Google will ask you to authorise the script to access your Sheets and Calendar — click through the permissions and run it again. Check your Google Calendar and you should see every row from your sheet appear as an event.
Step 3 — Create Events on a Specific Calendar (Not the Default)
If you want events to land on a specific calendar rather than your default one — a shared team calendar, for example — replace the getDefaultCalendar line with this:
// Replace with your calendar's exact name
const calendar = CalendarApp.getCalendarsByName('Project Deadlines')[0];

// Or use the calendar ID found in Calendar settings
const calendar = CalendarApp.getCalendarById('your-calendar-id@group.calendar.google.com');
You can find a calendar's ID by opening Google Calendar, clicking the three-dot menu next to the calendar name, selecting Settings, and scrolling to the Calendar ID field near the bottom of the page.
Step 4 — Prevent Duplicate Events
If you run the script more than once, it will create duplicate events for every row. The safest fix is to track which rows have already been processed using a dedicated column — column F in this example:
function createCalendarEventsFromSheet() {
  const sheet    = SpreadsheetApp.getActiveSpreadsheet().getSheetByName('Sheet1');
  const calendar = CalendarApp.getDefaultCalendar();
  const data     = sheet.getRange(2, 1, sheet.getLastRow() - 1, 6).getValues();

  data.forEach(function(row, index) {
    const title       = row[0];
    const dateStr     = row[1];
    const startTime   = row[2];
    const endTime     = row[3];
    const description = row[4];
    const status      = row[5]; // Column F — 'Created' flag

    // Skip empty rows and already-processed rows
    if (!title || !dateStr || status === 'Created') return;

    const startDate = new Date(dateStr + 'T' + startTime + ':00');
    const endDate   = new Date(dateStr + 'T' + endTime   + ':00');

    calendar.createEvent(title, startDate, endDate, {
      description: description
    });

    // Mark this row as done in column F
    sheet.getRange(index + 2, 6).setValue('Created');
    Logger.log('Created: ' + title);
  });
}“Always mark processed rows. A script that creates 30 duplicate calendar events at 2 AM is not a good automation.
Step 5 — Create All-Day Events
For deadlines, holidays, or milestones where you only care about the date and not a time window, use createAllDayEvent instead of createEvent:
// All-day event — only needs a title and a Date object for the day
const eventDate = new Date(dateStr);
calendar.createAllDayEvent(title, eventDate, {
  description: description
});
You can mix timed events and all-day events in the same sheet by adding a Type column. If the cell says 'All Day', call createAllDayEvent; otherwise call createEvent with start and end times.
Step 6 — Add Guests to the Event
CalendarApp lets you invite attendees directly when creating an event. Add a Guests column to your sheet (column G) with comma-separated email addresses, then pass them in the options object:
const guests = row[6]; // Column G — e.g. 'ali@example.com,sara@example.com'

calendar.createEvent(title, startDate, endDate, {
  description: description,
  guests: guests,
  sendInvites: true  // Set to false to add guests silently
});
Each invited guest receives an email invitation and can accept or decline from their own Google Calendar. This is especially useful for scheduling recurring review meetings or onboarding sessions directly from a planning sheet.
Step 7 — Run the Script Automatically with a Trigger
Instead of running the script manually every time you add rows, set a time-based trigger to run it on a schedule. In the Apps Script editor, click Triggers (the clock icon on the left sidebar), then Add Trigger. Choose your function, set the event source to Time-driven, and pick how often it should run — every hour, every day, or on a specific schedule.
You can also set the trigger programmatically so it is version-controlled alongside your code:
function createTrigger() {
  // Runs createCalendarEventsFromSheet every day at 8 AM
  ScriptApp.newTrigger('createCalendarEventsFromSheet')
    .timeBased()
    .everyDays(1)
    .atHour(8)
    .create();
}
Run createTrigger once and it registers the daily schedule. Because the script checks the 'Created' flag in column F before acting, running it every day is completely safe — it only processes new, unprocessed rows.
Putting It All Together — The Full Script
Here is the complete, production-ready version combining duplicate prevention, guest support, and both timed and all-day event types:
function createCalendarEventsFromSheet() {
  const sheet    = SpreadsheetApp.getActiveSpreadsheet().getSheetByName('Sheet1');
  const calendar = CalendarApp.getDefaultCalendar();

  if (sheet.getLastRow() < 2) return; // Nothing to process

  const data = sheet.getRange(2, 1, sheet.getLastRow() - 1, 7).getValues();

  data.forEach(function(row, index) {
    const title       = row[0]; // A: Event Title
    const dateStr     = row[1]; // B: Date (YYYY-MM-DD)
    const startTime   = row[2]; // C: Start Time (HH:MM)
    const endTime     = row[3]; // D: End Time (HH:MM)
    const description = row[4]; // E: Description
    const status      = row[5]; // F: Status flag
    const guests      = row[6]; // G: Guests (comma-separated emails)

    if (!title || !dateStr || status === 'Created') return;

    const options = { description: description };
    if (guests) {
      options.guests     = guests;
      options.sendInvites = true;
    }

    if (startTime && endTime) {
      // Timed event
      const startDate = new Date(dateStr + 'T' + startTime + ':00');
      const endDate   = new Date(dateStr + 'T' + endTime   + ':00');
      calendar.createEvent(title, startDate, endDate, options);
    } else {
      // All-day event
      const eventDate = new Date(dateStr);
      calendar.createAllDayEvent(title, eventDate, options);
    }

    sheet.getRange(index + 2, 6).setValue('Created');
    Logger.log('Event created: ' + title + ' | ' + dateStr);
  });
}

function createDailyTrigger() {
  ScriptApp.newTrigger('createCalendarEventsFromSheet')
    .timeBased()
    .everyDays(1)
    .atHour(8)
    .create();
}
Common Errors and How to Fix Them
Invalid Date: This almost always means your date or time column is formatted as a Date type in Sheets rather than plain text. Select the column, go to Format → Number → Plain text, then re-enter the values as YYYY-MM-DD strings.
Cannot read properties of undefined (reading '0'): The script found an empty row it tried to process anyway. The if (!title || !dateStr) guard handles this in the scripts above — make sure you have not removed it.
Calendar not found: If you are using getCalendarsByName and get an empty result, double-check the calendar name is spelled exactly as it appears in Google Calendar, including capitalisation and any special characters.
What to Build Next
Once you have calendar events flowing from your sheet automatically, consider pairing this with the trigger on edit approach to create an event the moment a row is added — check out our guide on Google Apps Script trigger on edit for the exact setup. You can also extend the script to update or delete existing events by storing the event ID back in the sheet after creation, then using calendar.getEventById() to fetch and modify it later.
Google Apps Script Copilot writes automation scripts like this one from a single prompt — free to try.